
CASTING DIRECTORS: How Do I Use FastCapture Live?
This article explains how Casting Directors can use FastCapture Live, Casting Networks’ all-in-one remote audition platform. FastCapture Live allows you to host virtual auditions, record them, and manage the entire process without needing other software.
Creating a FastCapture Live Schedule
To create a schedule:
Click Schedules below your project name.
Click New Schedule.
Choose Audition or Callback.
Enter your audition details:
Audition/Callback Date
Schedule Name
Audition Location: You must select Online - FastCapture Live.
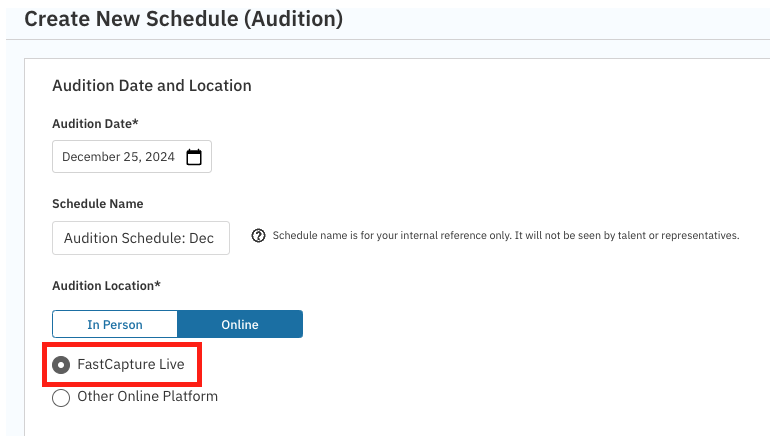
(Optional) Enter any audition location notes.
Time Zone: Be sure your time zone is set correctly!
Click Save and Customize Schedule.
Click Add Timeframe to start building your schedule.
Choose your start and end times and manually add talent to your timeslots or autofill with your selections.
Click Add This Timeframe.
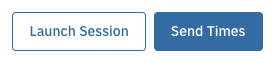
You can drag and drop talent into timeslots within the schedule or from the talent pool on the left. When ready, click Send Times in the bottom right corner.
Running a Session
Create your schedule in Casting Networks and select Online - FastCapture Live as the audition location. Send out your audition requests to talent.
On audition day, return to your schedule and select Launch Session at the bottom of the screen.
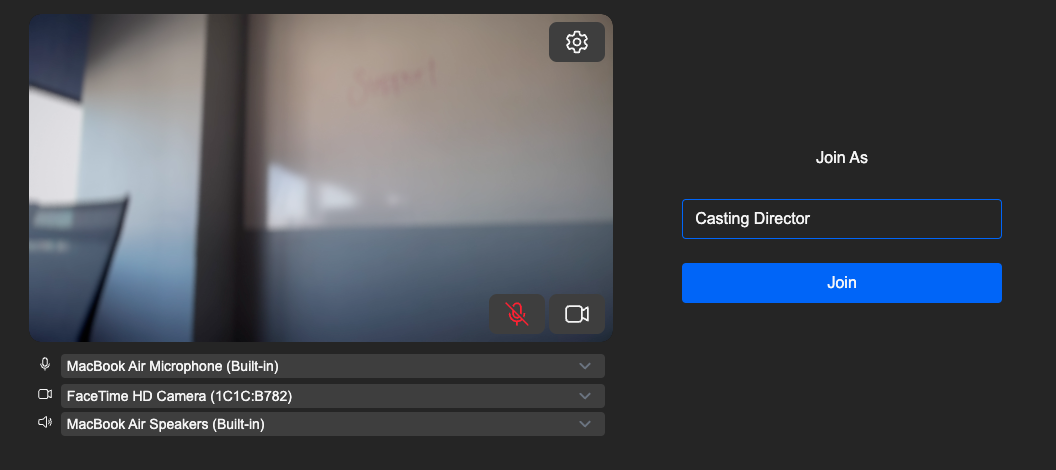
Before entering the session, you will have a few options:
The name you’d like to display to all participants.
The ability to choose your camera, microphone, and speakers.
You can mute your microphone or turn off your camera before entering the session.
By clicking the gear icon, you can also test your audio, mirror your video, and confirm your connection strength.
Once you have joined the session, the schedule is on the right-hand side of the screen. You will be able to admit one or multiple talent, depending on your audition requirements. Other actions you can take:
Mute and turn off cameras for all participants.

Pin the auditioning actors in the staging area.
Chat with talent both in the active audition and in the waiting room.
Chat with your clients while viewing the active audition.
When talent are in the session and ready, press the record button at the bottom of the screen to create a video.

You can take as many takes as are necessary. Clips can be trimmed and renamed, if desired, under the Media tab on the right-hand side by clicking the video preview thumbnail image.
If there is a take that doesn’t make the cut, you can leave it unchecked under the Media tab when clicking “Finalize,” and it will not upload. Alternatively, you can go into the group details in your Session on Casting Networks and delete the file from the group.
Once a talent is finished, click Finalize under the Group or Media tab.
Repeat for each talent.
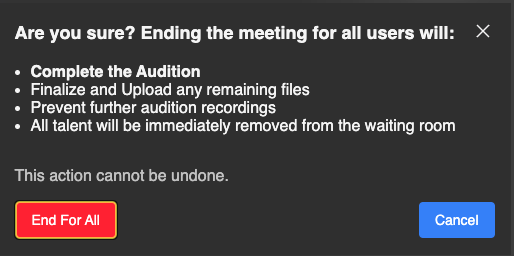
Click Leave and End for All when completely finished with the session - this should copy all draft groups to Casting Networks.
Group & Media tabs
Save Draft: You can save a group to "draft" status, so that the active group and current media tabs will clear out, and another audition can begin. Saved drafts can be restored to the active from the "Drafts" button on the toolbar.
Drafts Modal Window: This window displays all draft and finalized groups in an ordered list. Finalized groups can be restored to view the recorded video, comments, and snapshots. No changes can be made to a finalized group. Draft groups can be restored and edited.
Edit Audition Takes
You can make small edits to each take within FastCapture Live.
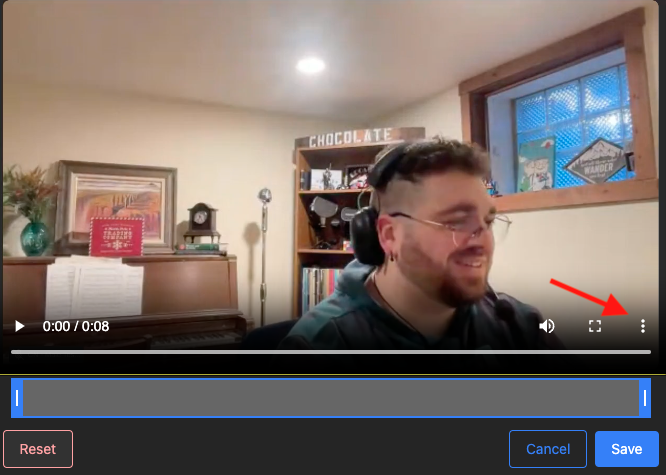
After the audition take has been recorded, navigate to the Media tab.
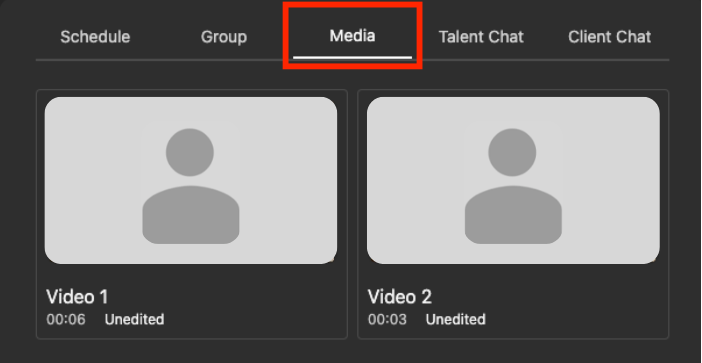
To start editing, click on the first take you wish to edit. A new screen will appear that will allow you to make crops or cuts by dragging the video feed bar at the bottom of the screen. Once desired edits are completed, be sure to click Save.
Note that after you have saved the edits, any takes that you have updated will read as “Modified.”
When you have made all preferred edits on all audition takes, you must finalize the group. This action, once completed, will add all captured media from the group into the corresponding session on Casting Networks.
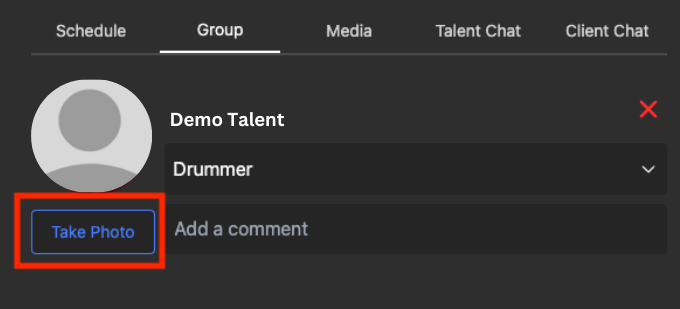
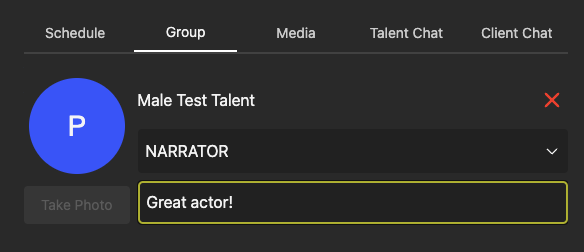
Taking Talent Snapshots
You may want to take a snapshot of talent when they are auditioning for you in FastCapture Live. To do this, navigate to the Group tab and select Take Photo on the left-hand side of the tab.
After you have captured the snapshot and all desired takes of the audition, the very last step will be to finalize.
Snapshots can not be taken while in Gallery view.
Switching Audio & Video Sources
You can switch your video and audio sources within FastCapture Live. Please note that the audio and visual clarity of the talent will be coming from the talent's connection and not from your side. You may want to select an external camera and/or mic per your discretion and preference.
When first launching FastCapture Live, a screen will appear that will offer the ability to confirm or edit your name, as well as confirm or switch your Microphone, Video, and Speaker.
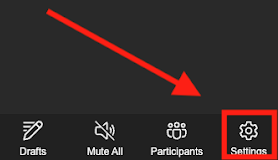
If you need to adjust the video or audio sources after you have joined, you will see the Settings option in the lower right-hand corner of the screen. By selecting Settings, you will be able to adjust Audio and Video. You can also check your Connection strength.
You can choose any type of camera that also functions as a webcam. Most built-in cameras should work well. Your experience may vary if you choose to use other equipment hooked up to your device.
Chat Functions
You have two different types of Chat Functions within FastCapture Live: Talent Chat and Client Chat.
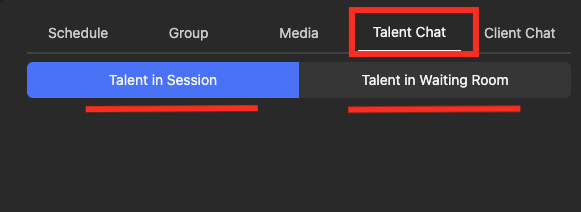
Talent Chat
Within Talent Chat, you will find two separate ways to message talent. The first is Talent in session; this can be used in situations where you or the talent might be experiencing audio issues so that communication can remain open. The second is Talent in Waiting Room; this can be used to message any talent that have "Admit" appear next to their name. This might be used if you are running behind schedule to let talent know to “hold on!”
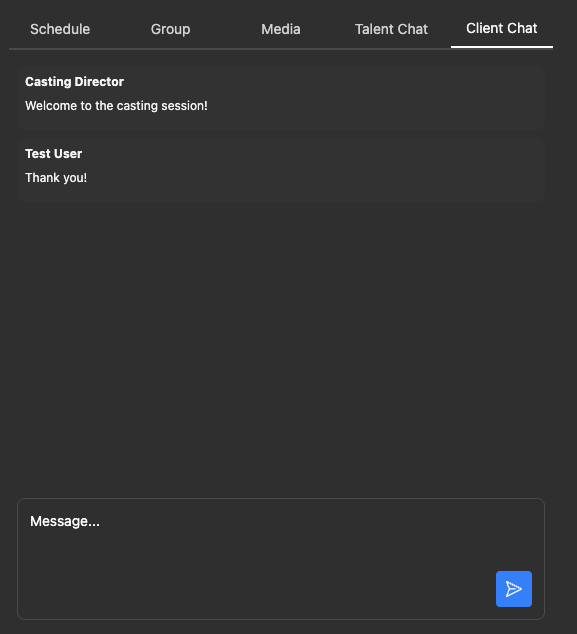
Client Chat
Client Chat can be used to communicate with anyone else on your casting team or with your client. Anyone who signs in as a casting director on Casting Networks, or any users who sign in using a Viewer Link, will be able to chat and view within the client chat. Note: The client chat is only visible to the casting director. Clients and talent cannot communicate with each other via chat.

Sides
You can add sides to a FastCapture Live session in two different ways. First, sides can be added to roles when creating a project. These will be visible to talent when they receive their audition request ahead of the actual audition day.
Additionally, sides can be added directly by you using the “Sides” tab during the audition. The files uploaded should be in PDF format. Once uploaded during the casting session, they will be visible to the talent, who can use them during the audition.
Screen Sharing
You can now share your screen to the meeting, viewable by all meeting user types within the gallery view. Just click the “Screen Share” button to start sharing your screen. You can choose a single tab from your browser, a window, or the entire screen. Audio can be shared only by sharing a single tab.

You may need to click the “Switch View” button and select “Gallery View” to be able to see both the shared screen as well as the other speakers in the audition room.
Note: Recording is not available during screen sharing.
FAQs
Q: Can I view a talent’s profile?
A: Yes, you can view talent profiles by clicking on their name under the “Schedule” tab in the right-hand panel. The profiles will open in a new tab.
Q: What to do if a talent misses their audition?
A: When you launch a FastCapture Live session, you will see in the Schedules tab the list of talent in the order in which they were added to the schedule on Casting Networks. When a talent has entered the session, a blue button reading "Admit" will appear next to the designated talent. When you are ready to see the talent, you simply need to select "Admit," and the talent will appear live in the session. The same can be said if there are multiple actors using multiple devices. You will need to select "Admit" on all talent they would like to see live in the session. If a talent misses their audition, you can simply look further down the list to see if any talent are ready to be admitted.
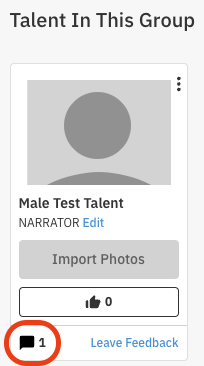
Q: Where will my notes show up on Casting Networks?
A: Under the Group section, you can add comments regarding the talent who are auditioning. You can only leave one comment per group. These comments can be viewed in various locations within Casting Networks:
Sessions: Navigate to the corresponding session created from FastCapture Live and click Group Details for the desired talent to view the comment. The comment will be visible by clicking the chat bubble icon under the talent's photo.
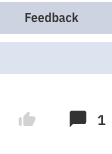
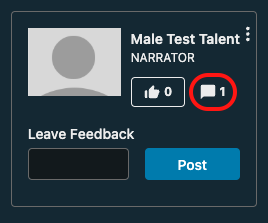
Worksheet: Under the Feedback column, click the chat bubble icon.
Presentation Link: The feedback will show under the talent photo, next to the video that’s playing. Note: Make sure "Leave Feedback" and "See Feedback Left by Others" are selected on your link settings to make feedback visible to all.
Q: Can I download media from FastCapture Live onto my computer?
A: Yes! Just follow these steps:
Click Media.
Choose the video you want to download, and click on the video to bring up the player.
Click the three-dot menu on the right-hand side of the window and choose Download.
You can also download the videos from the session on Casting Networks at any time after the session.
Additional Information:
The quality of the video is based on the talent's internet quality, not the FastCapture Live program.
Each talent has their own specific link. Talent links cannot be shared.
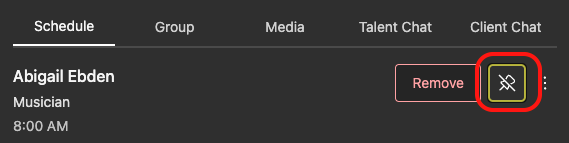
As the session runner, you can take the following additional actions by using the overflow menu next to a talent's name in the schedule:
Add to group: Manually add a talent to the active group.
Remove from waiting room: This will remove a participant from the FastCapture Live session. They can rejoin.
Mute: You can mute the participant's mic.
Video Off: You can turn the participant's video off.