
CASTING DIRECTORS: How do I set up and use FastCapture?
This article is for Casting Directors who want to use FastCapture to record and upload in-person auditions directly to Casting Networks. It covers the necessary equipment and step-by-step instructions for setting up your hardware and software, importing schedules, and troubleshooting.
Introduction Video
If you have already received the proper FastCapture version for your device, check out the installation and start-up video guide below!
General Hardware Information
Below is a list of all equipment that Casting Networks currently supports and recommends for use with FastCapture. Please keep the following details in mind regarding video quality and connections:
Video Quality: While higher-end cameras offer features like better lenses and 4K/6K resolution, FastCapture outputs video at 720P. Therefore, there is no significant advantage to using high-resolution 4K or 6K cameras exclusively for this software.
Connections: Any 1080P camera that outputs to HDMI should be sufficient.
We recommend the equipment listed in the following sections based on our internal testing and testing performed by our partners.
Recommended Equipment
This section lists the hardware that provides the best performance and is most actively recommended by our team.
Digital Cameras (Basic)
Panasonic
HC-V800
Digital Cameras (Advanced)
These cameras feature higher quality picture and sound.
Canon
VIXIA HF G70
Converter Boxes (Capture Card)
Magewell - USB Capture HDMI Gen 2
Please Note: Long-time customers may recall that Casting Networks previously recommended BlackMagic Converter Boxes. This is no longer the case. The BlackMagic devices we previously recommended are no longer supported by the manufacturer. Consequently, Casting Networks now explicitly recommends and supports only the Magewell Converter Box. Other HDMI capture devices may work, but we do not recommend or support them.
Computers
FastCapture runs only on Apple devices. We recommend recent models (2017 or newer). If purchasing new, we recommend a computer that is no more than 2 years old. FastCapture will run on all M-processor Macs.
MacBook Pro (2023-Current)
iMac (2023-Current)
Mac Mini (2023-Current)
Mac Studio (2023-Current)
Mac Pro (2023-Current)
Computer Operating System(s)
FastCapture runs on the following Apple OS versions:
Ventura
Sonoma
Sequoia
Tahoe
PC/Windows: N/A - Casting Networks does not support FastCapture on any Windows Computer OS.
Supported Equipment
This section lists legacy equipment that is still compatible with FastCapture, though it may not be the newest technology available.
Digital Cameras
Canon
VIXIA HF R800
VIXIA HF R700
VIXIA HF G40
XA11
Panasonic
AG-HVX200A
AG-AC30
JVC
GY-HM170UA 4KCAM
GY-HM200 4KCAM
Converter Boxes (Capture Card)
Magewell - USB Capture HDMI Gen 2
BlackMagic Converter Boxes are NOT compatible with FastCapture.
Please Note: As mentioned in the recommended section, BlackMagic devices are no longer supported. Casting Networks supports only the Magewell Converter Box.
Computers
FastCapture runs only on Apple devices. For supported legacy equipment, we support models from at least 2019. FastCapture runs on all M-processor Macs.
MacBook Pro (2019-Current)
iMac (2019-Current)
Mac Mini (2019-Current)
Mac Studio (2022-Current)
Mac Pro (2019-Current)
Computer Operating System(s)
FastCapture runs on the following Apple OS versions:
Ventura
Sonoma
Sequoia
Tahoe
PC/Windows: N/A - Casting Networks does not support FastCapture on any Windows Computer OS.
How to Allow Access for FastCapture
To use your camera and microphone with FastCapture, you'll need to adjust your settings in your computer's System Preferences application.
On your Mac, open the System Preferences application.
Click on Security and Privacy.
Within the Privacy tab, scroll to the Microphone and Camera options.
Ensure FastCapture has a checkmark next to both to grant access.
Logging In to FastCapture
To log in to the FastCapture application, you will use the same login credentials you use for your Casting Networks account. Your username is the full email address associated with your account.
When you open the FastCapture application on your computer, you will be presented with two initial options before you are prompted to sign in:
"Create a new FastCapture File"
"Open an Existing FastCapture File"
Click on your desired option to proceed (both options require the same login information).
Once you have selected your option, you will be asked to enter your Username and Password.
To log in later during a session, click the globe symbol at the top center of the screen.
Working Offline
If you select a project from the "Recent Documents" menu, you may see an option to Work Offline. This allows you to run an audition session without an active login; however, no videos will upload to the queue until you sign in.
Setting Up Your FastCapture System
When starting each FastCapture session, always start by plugging equipment in from the camera, working towards your computer.
Mount your digital camera and connect the HDMI cable to the HDMI Out port.
Plug the other end of the HDMI cable into your converter box.
Connect the converter box to your computer via USB (use a USB-C to USB-A converter if necessary).
Open FastCapture and log in.
Set the video and audio input settings to the external camera/converter box.
Disable onscreen information on your camera to prevent it from being recorded.
Import your schedule and begin your session.
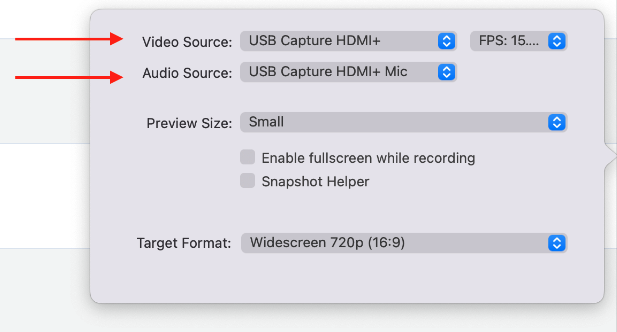
Adjusting Video and Audio Settings
The settings window usually appears at login. If it does not:
Click on the gear icon located next to the video on your screen.

Locate the Video Source and Audio Source dropdown menus.
Select your external device from the list.
Note: If you use a capture card, your audio and video source will typically be the same unless using a separate external microphone.
What should I know if I am using a Capture Card?
If you are using specific hardware setups, please review the note below:
If you are using a capture card, your audio and video source will be the same, unless you are using a separate external microphone.
Adjusting the Audio Sync in FastCapture
If audio falls out of sync, use the built-in adjustment tool before the video leaves the application:
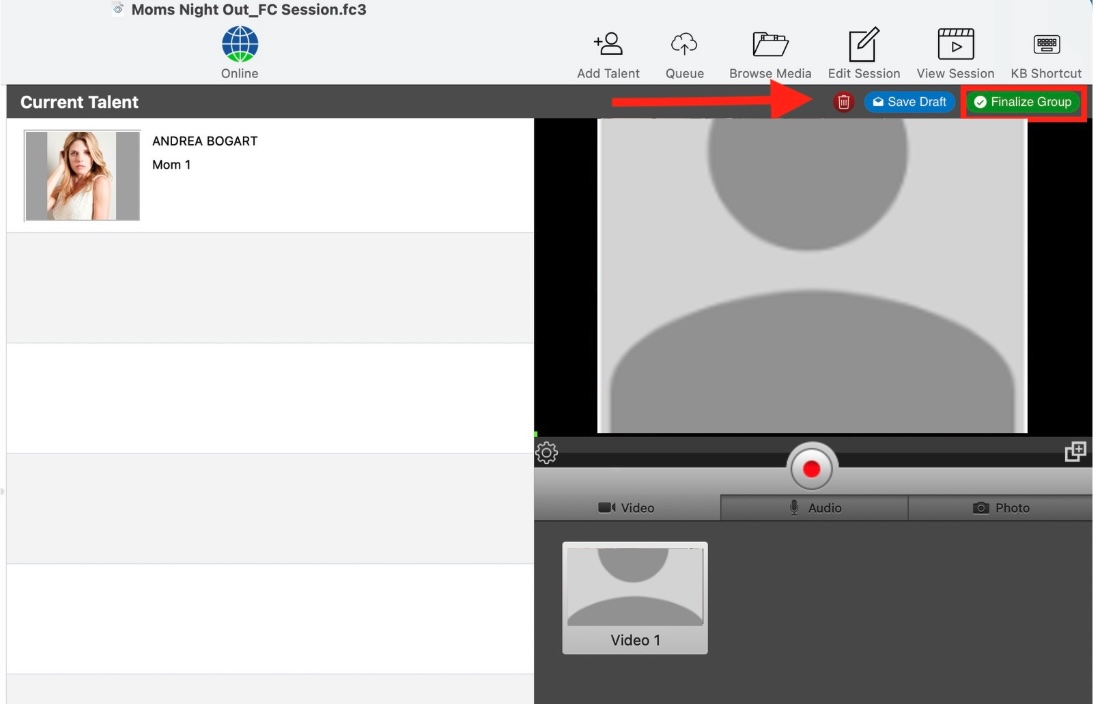
Once you have captured your audition tape(s), click Finalize Group at the top right.
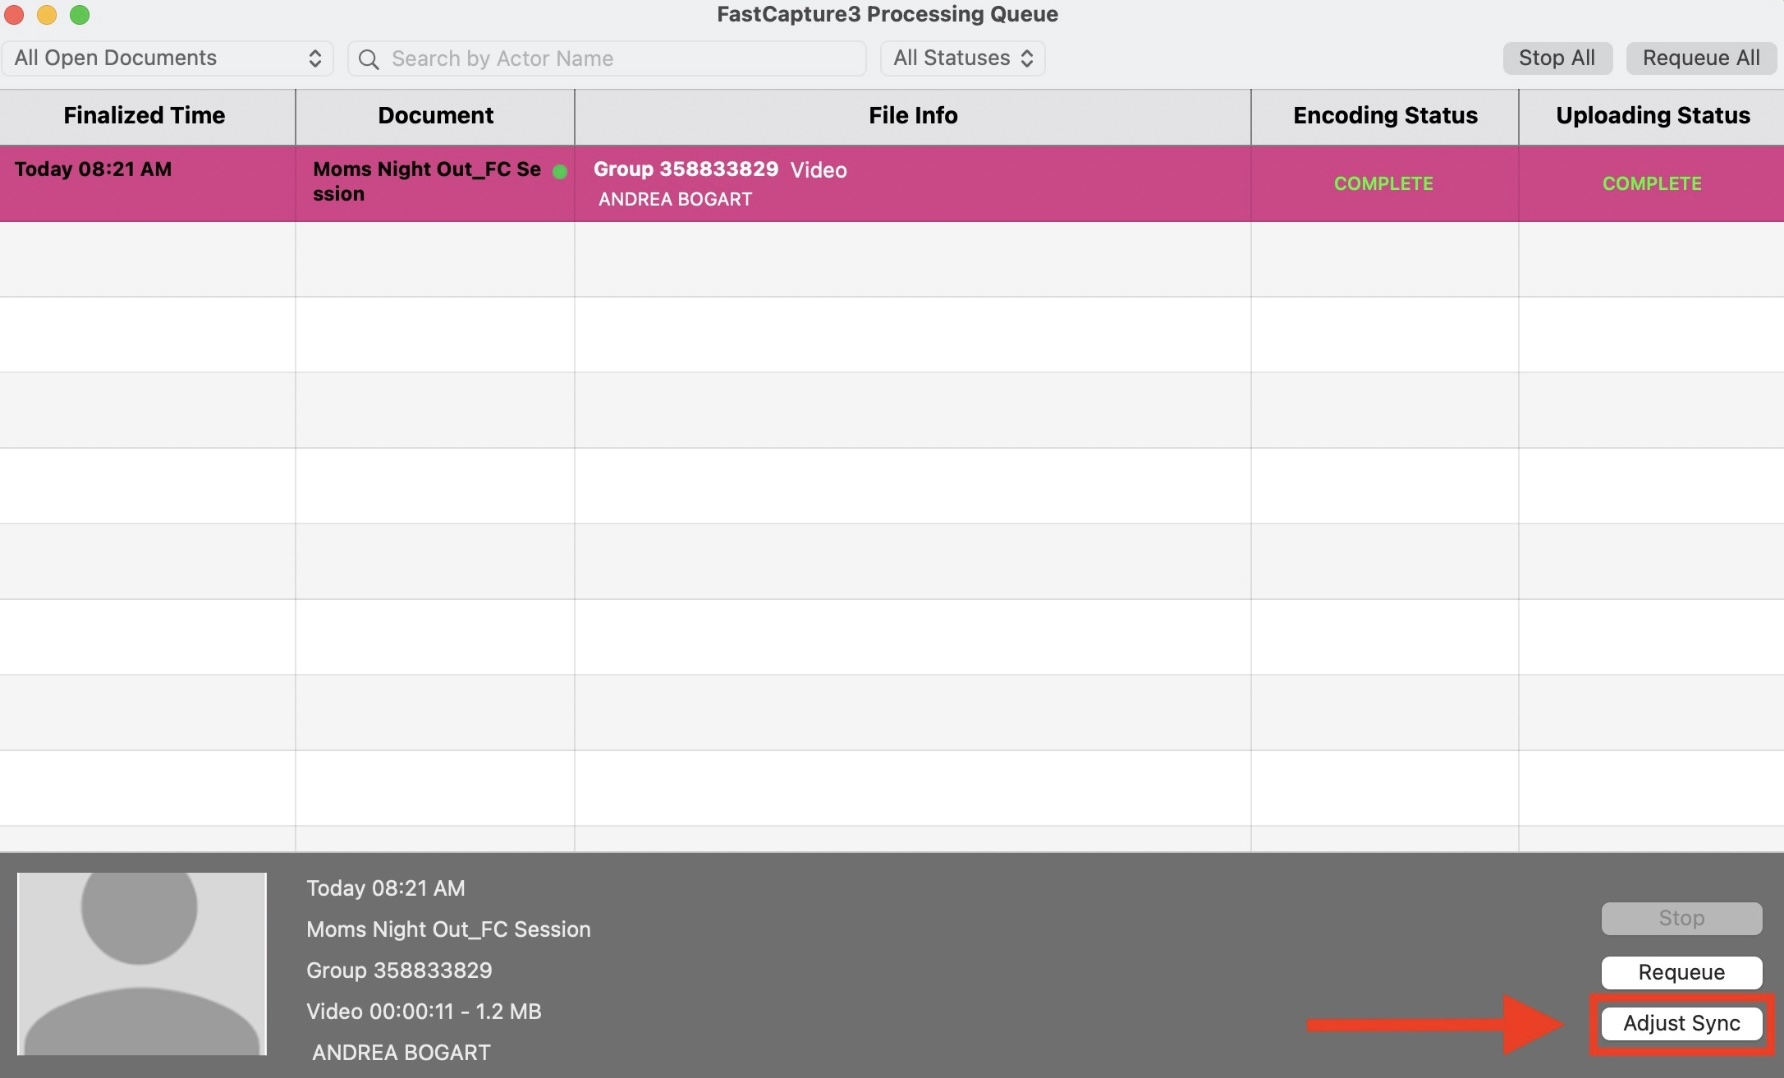
Navigate to the “Queue” page.

Select the specific talent's video and click Adjust Sync.
Use the Audio Offset (-) and (+) buttons to align the sound.
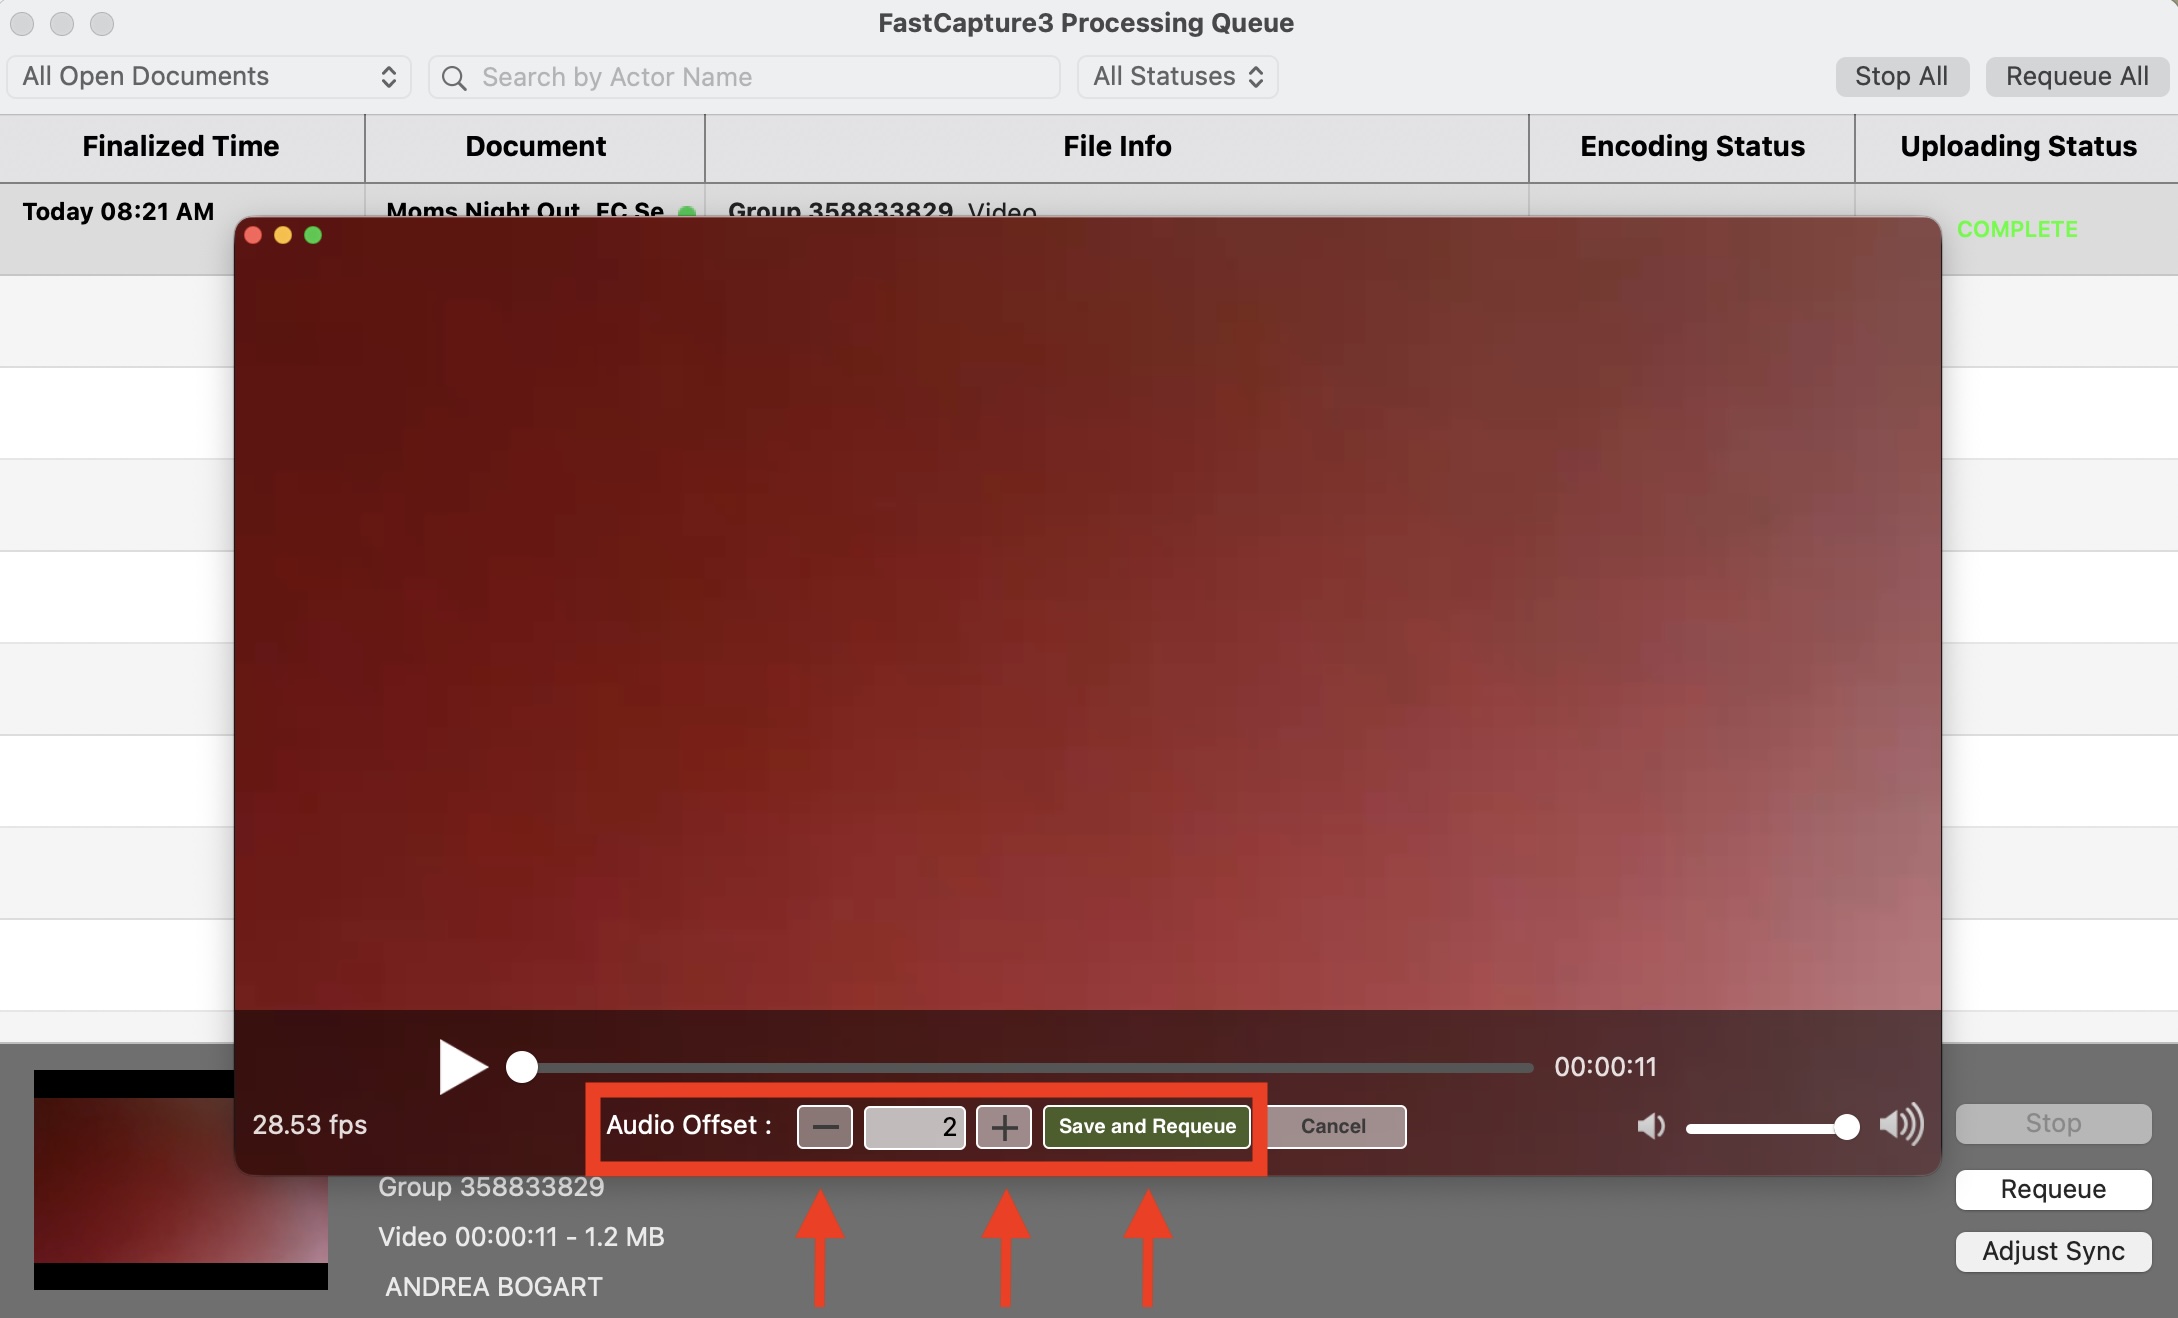
Click Save and Requeue, then confirm by clicking Ok.
FAQ’s
Can I adjust the audio sync after the video has been uploaded to Casting Networks?
No, the audio sync adjustment is exclusive to the FastCapture application and must be done before the video leaves the Queue.
What does "Requeue" mean in this context?
Requeue means the video is placed back into the processing line to be rebuilt with your new audio sync settings. You must wait for this process to finish for the changes to take effect.
What are the hardware requirements for FastCapture?
This article outlines the specific hardware requirements for using FastCapture software. Below you will find a detailed breakdown of recommended cameras, capture cards, and computer specifications to help Casting Directors and studio operators ensure a successful recording session.