
TALENT: How Do I Use FastCapture Live For My Audition?
This article explains what FastCapture Live is and provides step-by-step instructions for you, the Talent, on how to use the feature for your virtual auditions through Casting Networks.
What is FastCapture Live?
Welcome to FastCapture Live – a new way to do online auditions! FastCapture Live is designed to make your online audition experience as simple and seamless as possible. Here’s what you need to know:
No Extra Software: You won't need to download anything or go to other websites. Everything is done directly through the Your Alerts section of your Casting Networks account.
Easy Scheduling: Casting directors will send you a request to set a time for your virtual audition. On your audition day, you will join online directly through your audition request.
Familiar and Simple: When you join, you will wait in a virtual waiting room until the casting director admits you. Once admitted, you will see your video feed and the casting director on the screen.
Straightforward Communication: A chat feature allows you to communicate with the casting director in the waiting room and during the session.
Everything in One Place: Once your audition is complete, the casting director handles the rest!
How Do I Use FastCapture Live?
Entering a Session
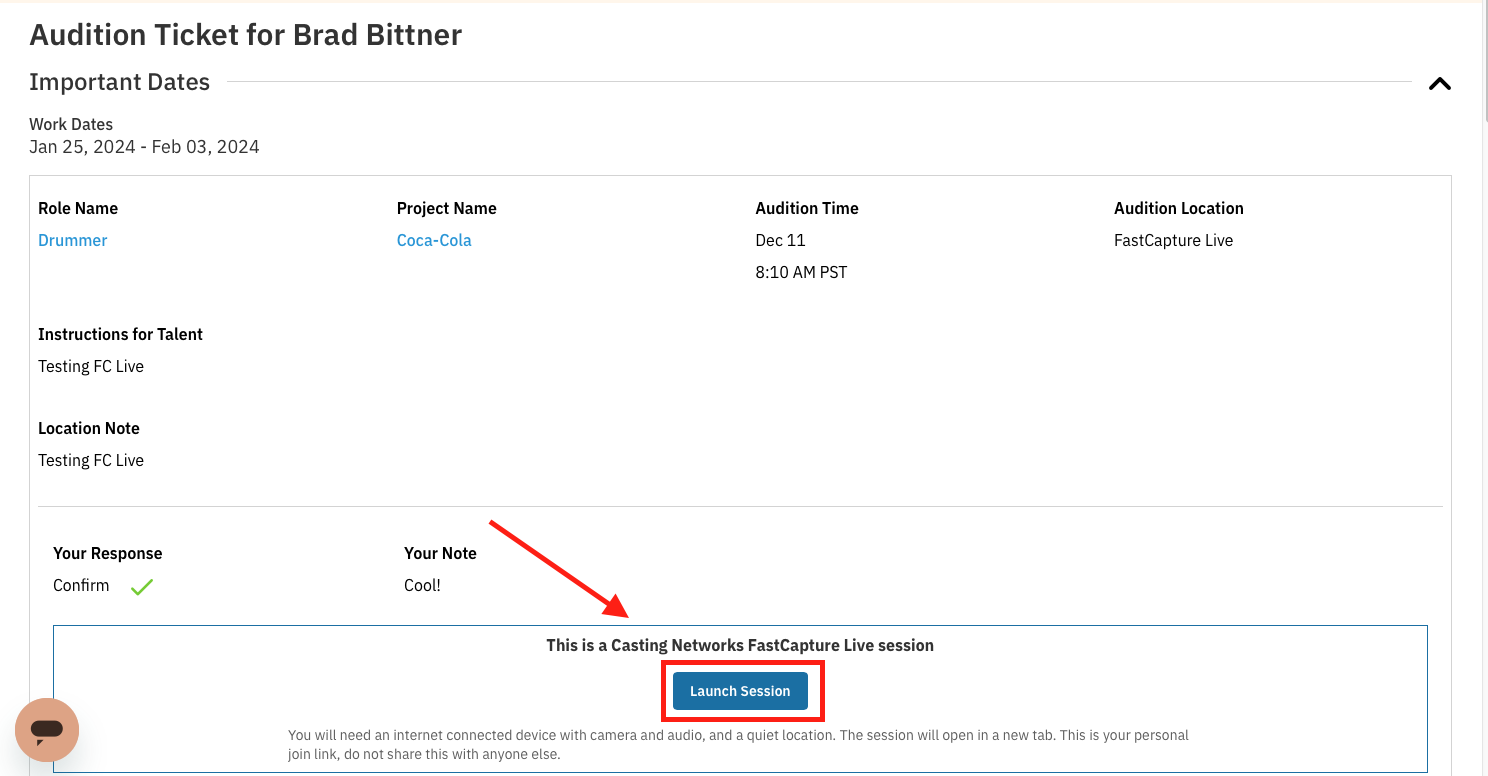
You will receive an audition request from a casting director, which can be found in the Your Alerts section of your Casting Networks account.
Locate the audition request for the correct casting director and project.
Once inside the Audition Request, click the link to Launch Session.
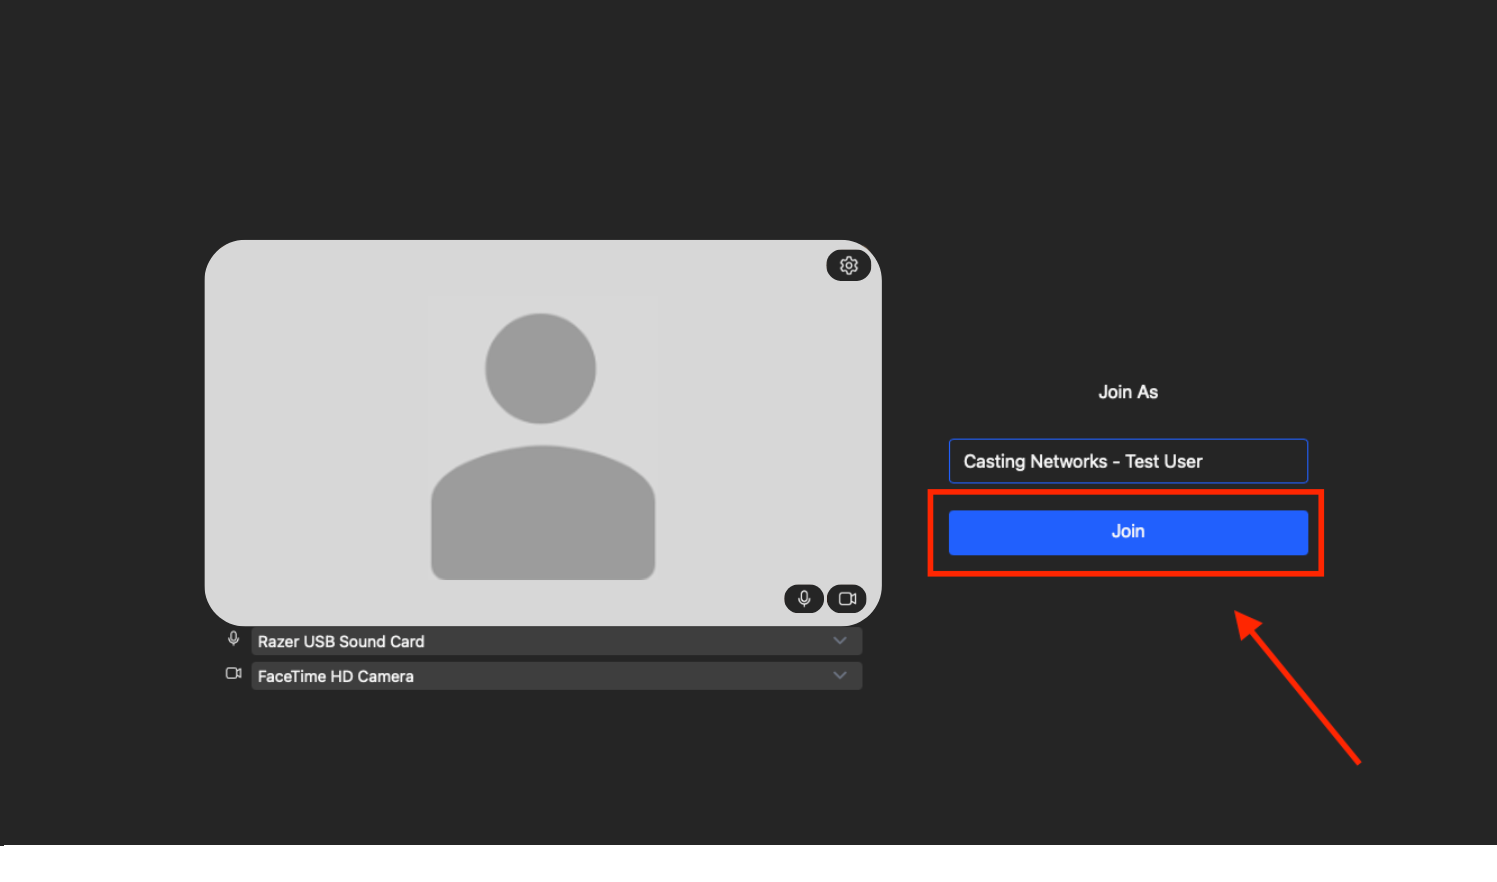
A new screen will appear where you can confirm or edit the name that will be displayed to casting. You can also switch your video and audio sources here.
When you are ready, click Join.
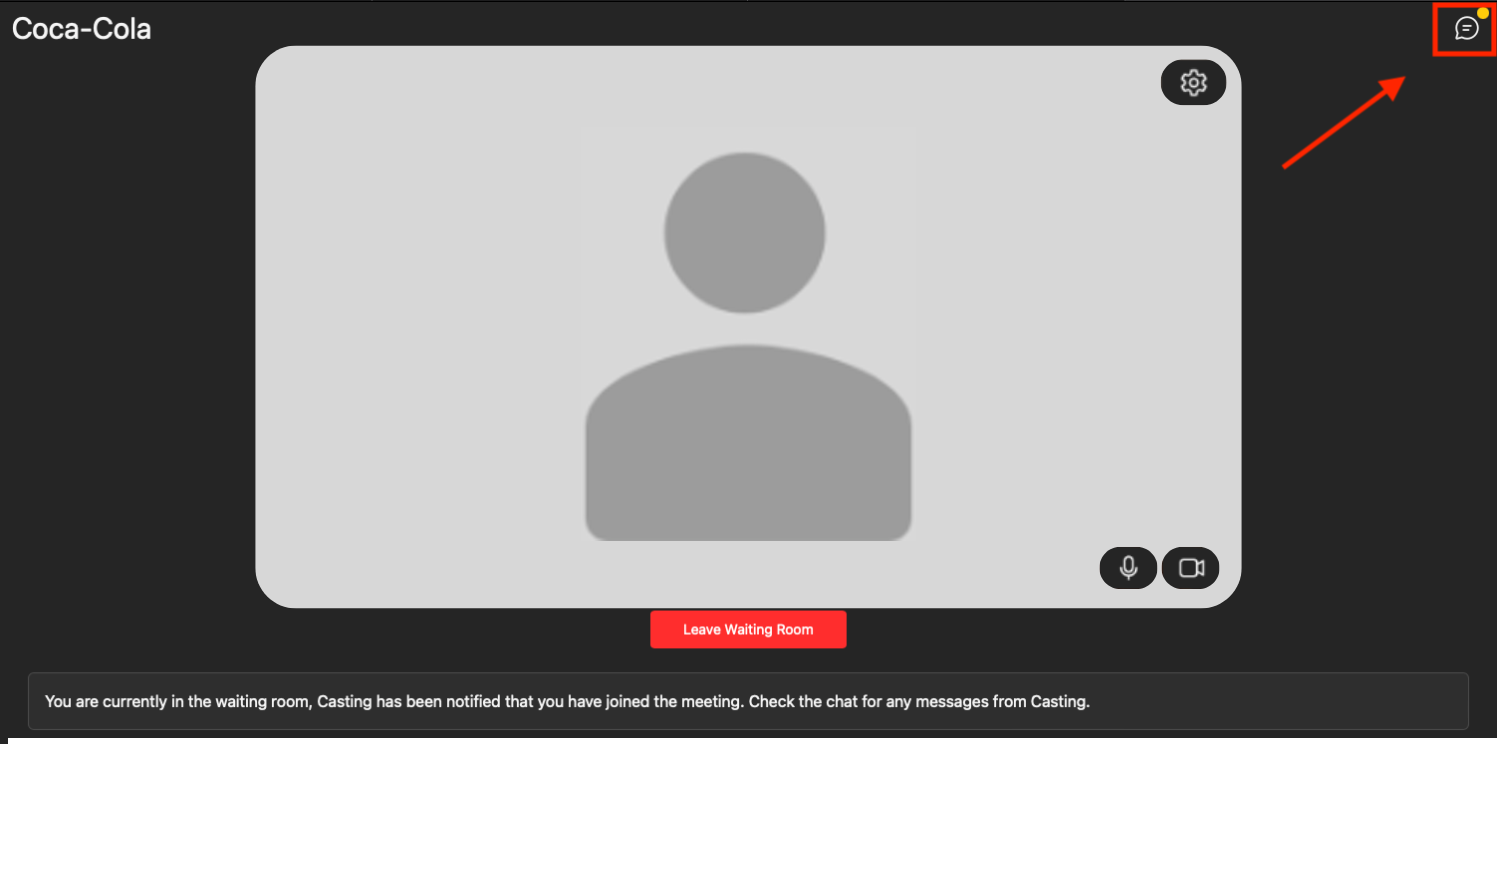
You will now be in the waiting room until the casting director admits you into the session. If you need to leave, you can click the red Leave Waiting Room button.
Chat
Casting directors can communicate with you via chat during the session.
In the Waiting Room: If the casting director sends you a message while you're in the waiting room, a notification will appear in the top right corner of the screen. Click on it to read the messag
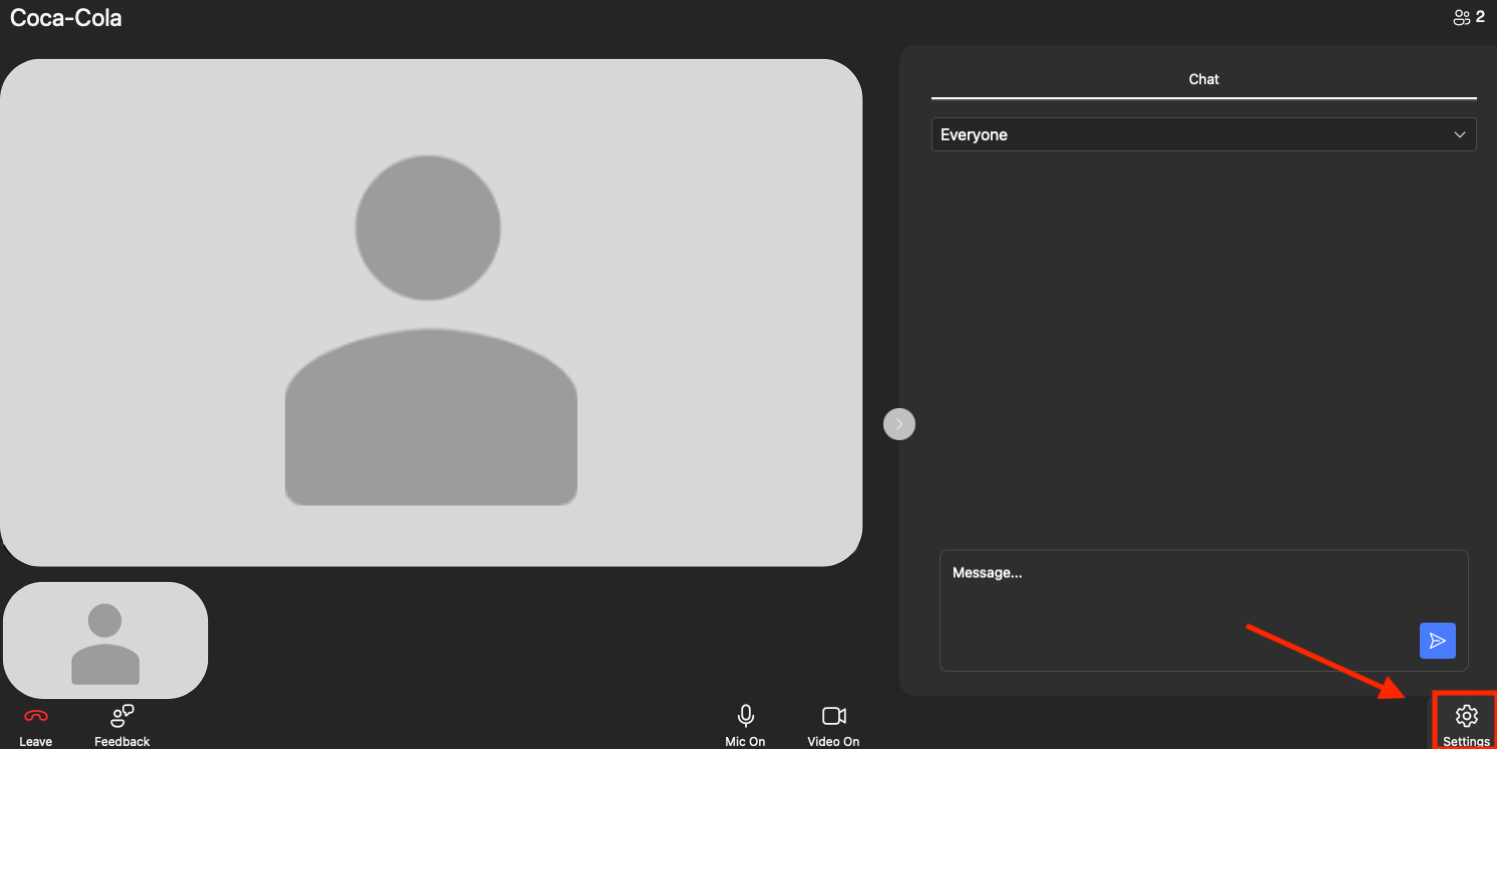
During the Audition: The casting director can also message you after you've been admitted to the session. This is helpful if there are audio issues. The chat box will appear on the right side of the audition room screen.
Switching Audio & Video Sources
You can switch your video and audio sources at two different points. For the best quality, please note that audio and visual clarity comes from your internet connection. You may want to use an external camera or microphone for your audition.
Before Joining: When you first launch the session, the pop-up screen will allow you to confirm or edit your name, as well as select your preferred Microphone and Video sources from the dropdown menus.
After Joining: If you need to adjust your sources after joining the session, click the Settings option in the lower right-hand corner of the screen. From here, you can adjust your Audio and Video sources and check your Connection strength.
Disabling Apple Video Reactions
Apple has introduced video reactions as a feature in MacOS 14 Sonoma, iOS 17, and iPadOS 17. These reactions can be activated with specific hand gestures and will cause images like hearts, fireworks, lasers, or confetti to appear on the screen, which you might not want during your audition. These reactions can be used across any program on your Mac with a video component, including in a FastCapture Live audition. This feature is on by default but is easily turned off.
On a Mac
When using FastCapture Live, click the video icon This icon appears in the menu bar when a program is using video.
If you are using multiple programs simultaneously that use video, you can adjust this setting for each program that you are using by selecting them at the top of the dropdown window. (Note: This choice will not appear if only one program is using video)
If the icon next to "Reactions" is blue, it is active. A gray icon means it is disabled. You can click the icon to toggle the "Reactions" feature on or off.
You can also activate or deactivate the “Portrait” and “Studio Light” camera filters from this menu as well.
On an iPhone/iPad
After your camera has turned on, access the Control Panel by swiping down on the upper right-hand corner of your screen.
Tap "Safari Websites Controls" (Note: If you are using a different web browser, that will show instead of Safari) at the top of the screen.
On the next screen, under the "Audio & Video" section, tap "Reactions" to turn them off.
If the icon next to "Reactions" is blue, it is active. A gray icon means it is disabled. You can click the icon to toggle the Reactions feature on or off.
You can also activate or deactivate the “Portrait” and “Studio Light” camera filters from this menu as well.
If you would like to learn more about this feature from Apple, you can do so HERE.
Frequently Asked Questions (FAQs)
Do I need to download any special software?
No, you do not. Everything is done directly through the Casting Networks website in the Your Alerts section.
How will I know I have a FastCapture Live audition?
You will receive an audition request from the casting director, which will appear in the Your Alerts section of your account. Within the request, the alert will specify that it is a FastCapture Live Session.
Can I talk to the casting director if my audio isn't working?
Yes. There is a chat feature that allows you to communicate with the casting director, both in the waiting room and during the live session.
Can I use an external microphone or camera?
Yes. You can select your preferred audio and video sources before you join the session or change them in the Settings menu once you are in the session.