
CASTING DIRECTORS: How do I create an Audition Schedule and add talent?
This article is for Casting Directors who want to add talent to an audition schedule and send appointment times to talent or their representatives. Whether you are manually placing talent into time slots, using the auto-fill feature, or communicating schedule details to talent, this guide walks you through each step.

Creating a New Audition or Callback Schedule
From your Project Lists page, select the project name.
Click Schedules below your project name.

Click New Schedule
Choose Audition or Callback.
Enter your audition details.
Click Save and Customize Schedule.
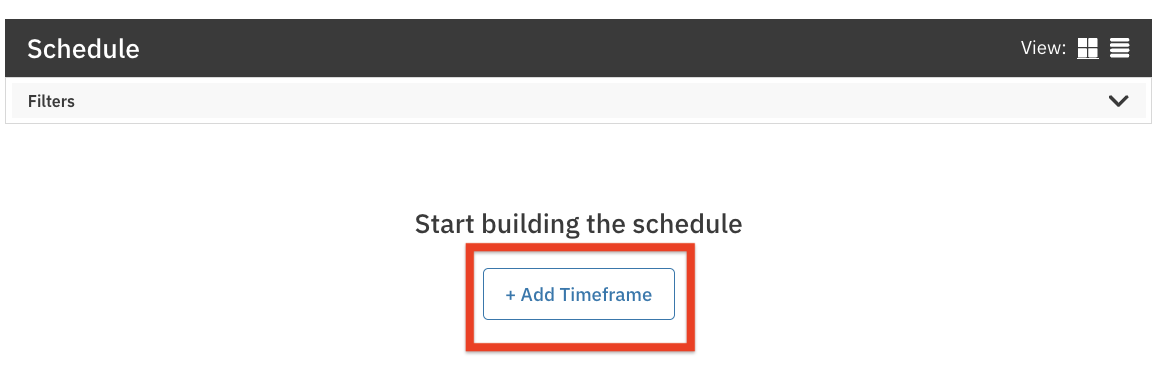
Click Add Timeframe to start building your schedule.
Choose your start and end times and manually add talent to your timeslots or autofill with your selects (You can use the Autofill option to automatically fill time slots based on roles and selection tags).
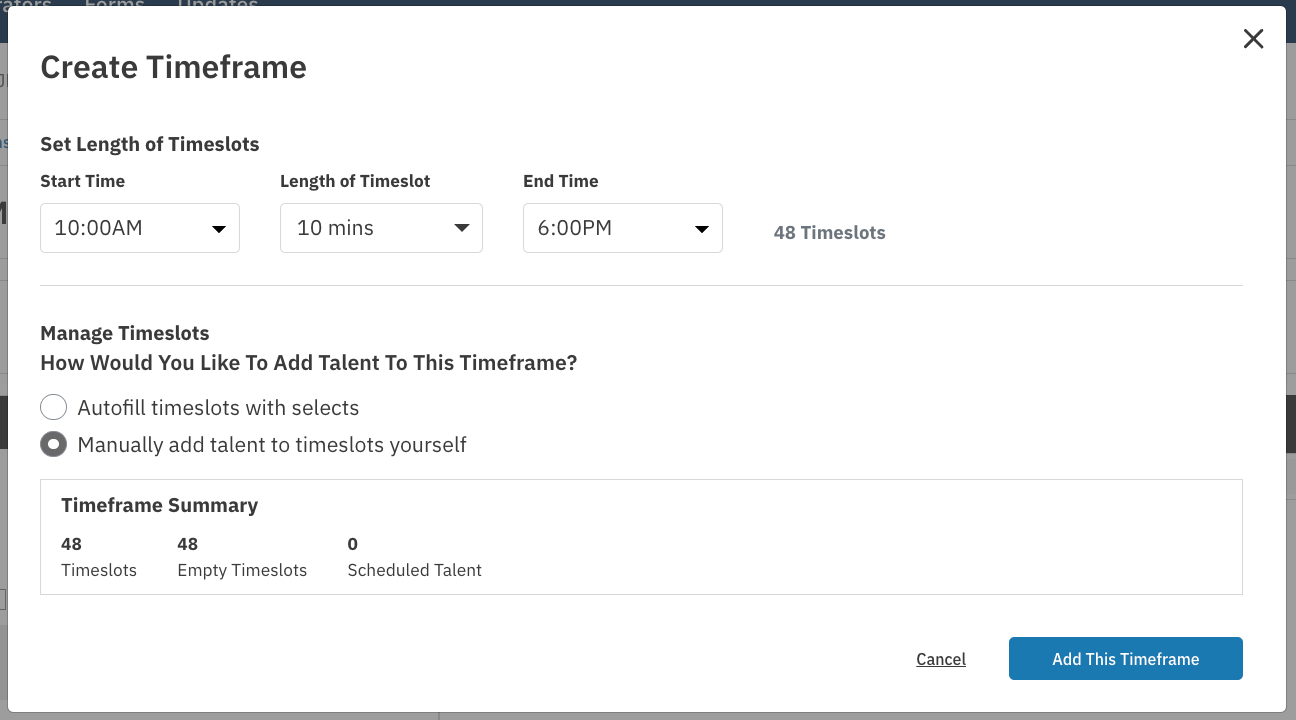
Click Add This Timeframe.
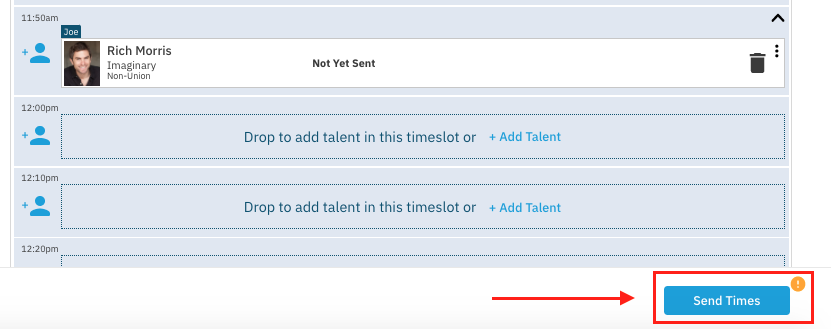
You can drag and drop talent into timeslots within the schedule or from the talent pool on the left. When ready, click Send Times in the bottom right corner.
Once a timeframe has been added to your schedule, you have two ways to place talent into time slots:

Drag and drop talent from the talent pool on the left side of the screen directly into any timeslot within the schedule.
Select the + Add Talent button to search for a specific talent by name.
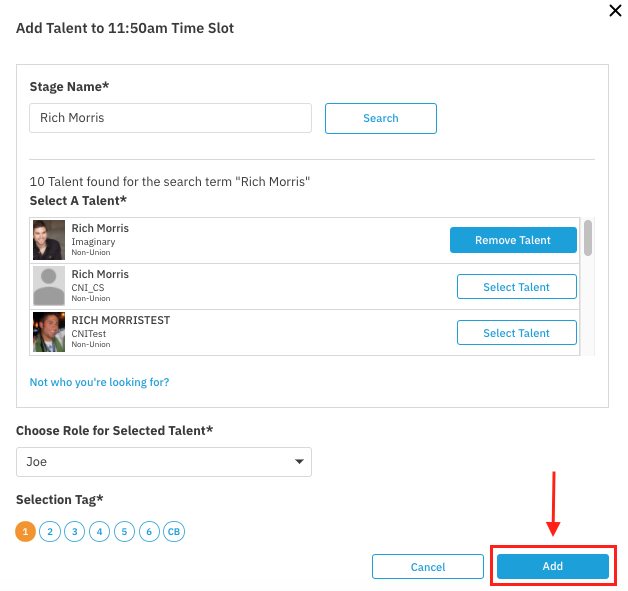
When using + Add Talent:
Search for the talent you want to add.
Select the role you want to audition them for.
Add them to the desired timeslot.
Auto-fill Talent in a Schedule
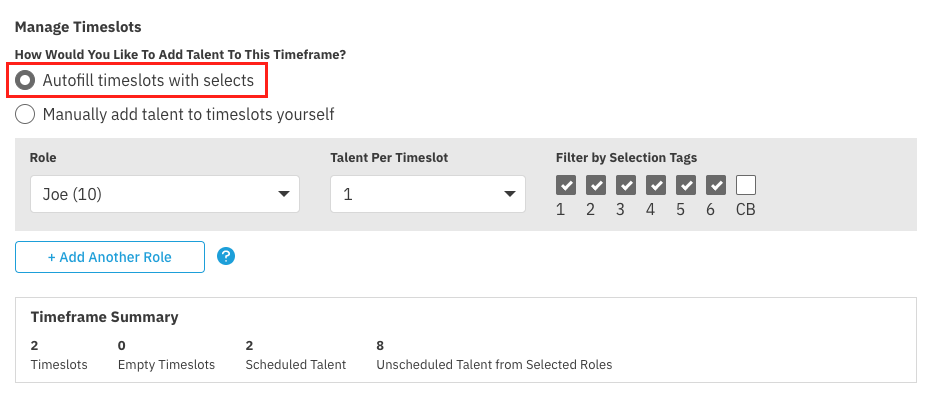
The auto-fill option lets you populate your schedule automatically when adding a new timeframe. Here is how to use it:
When adding a timeframe to your schedule, look for the auto-fill option.
Choose the role you want to fill.
Set the number of talent per time slot.
Optionally, filter by selection tag to narrow down which talent are included.
To add multiple roles to the same timeframe, select the option to add an additional role.
When finished configuring, click Add This Timeframe.
After auto-fill runs, you can still drag and drop talent within the schedule or from the talent pool on the left to make any adjustments.
Sending Times to Talent / Talent Representatives
When your schedule has at least one talent added, the Send Times button will appear in the bottom right corner of your screen.
If you see an orange exclamation point next to Send Times, this means there are new times that have not yet been sent to talent.
Click Send Times to notify talent or their representatives of their scheduled appointment.
After you have sent the schedule at least once, clicking Send Times gives you three options:
Send to all talent on the schedule
Send only to talent with updated or new times
Send only to talent who have new times and have not yet responded to their requested time
Choose the option that best fits your needs and confirm to send.
Adding a Timeframe or Break to an Existing Schedule
Adding Additional Timeframe
Click Schedules below your project name.
Click the name of the schedule to which you want to add a timeframe.
When viewing the schedule, click Add Timeframe.

Enter your start and end times and choose to manually add talent to time frames or auto-fill with your selects.
Click Add This Timeframe.
You can drag and drop talent into time frames within the schedule or from the talent pool on the left. When ready, click Send Times in the bottom right corner.
Adding a Break
Click on Schedules below the project name.
Click on the schedule in which you’d like to add a break.
Click +Add Break.

Click on the drop-down options to set a start and finish time.
Click Add This Break to add the break to the schedule.
Updating Your Schedule (Date, Location, and Talent)
Update an Audition Date
Click on Schedules below the project name.
Click on the schedule for which you’d like to change the date.
Click on Edit by the schedule name at the top.
Click on the calendar icon and select a new date.
Click Save.
Note: The name of the schedule will not automatically update if you update the audition date. If you're updating the audition date, we recommend you also update the name of the schedule.
Update Your Schedule Location
Click on Schedules below the project name.
Click on the schedule for which you’d like to change the location.
Click on Edit by the schedule name at the top.
Enter the new location in the Audition Location fields.
Click Save.
Heads up: Changing the audition location for a schedule will not automatically update the audition information for any of your roles. Make sure you send times to all talent to ensure they are notified of the location change.
Move Talent to Another Time slot
Click on Schedules below the project name.
Click on the schedule you wish to edit.
Find the talent you wish to move, and click on the overflow menu (⋮).
Choose Move / Cancel Talent.
Choose Move Talent To Another Time slot.
Click on the timeslot you wish to move the talent to.
Click Move Talent.
You can also drag and drop talent to new timeframes. Remember to send the updated time to talent by clicking Send Times.
Canceling an Existing Schedule
Click Schedules below the project name.
Click on the specific schedule you’d like to cancel.
Next to the schedule name, click the overflow menu (⋮) and select Cancel Schedule.
A pop-up will ask you to confirm if you’d like to proceed. You have the option to include a message to talent to explain the reason for the cancellation.
Once ready, select Yes, Cancel Schedule.
The main schedules page will update, and the 'Last Sent' column will show 'Canceled'.
Note: Currently, there is no way to see the contents of a canceled schedule.
What Do the Icons Represent on the Schedules Page?
Confirmed: Talent and/or Representatives confirmed their scheduled time.

Declined: Talent and/or Representatives declined their scheduled time.

Reschedule Request: Talent and/or Representatives are requesting a date or time change.

Pending Request: Talent and/or Representatives are pending and have not yet replied to the request.