
TALENT: How Do I Add and Manage My Media on My Profile?
This article is for talent who want to add, edit, and organize the photos, videos, and audio clips on their Casting Networks profile. Here you will find everything you need to know about managing your media, from understanding your account’s allowances to rearranging the order of your headshots to ensure your professional materials are displayed correctly for casting directors.
What Are the Media Allowances by Membership?
Your media storage capabilities depend on your membership level:
Premium Membership: You can upload unlimited photos, videos, and audio files to your profile.
Free Membership: You receive 2 photo credits, 1 video credit, and 1 audio credit. Please note that media is not swappable; deleting a file does not restore the credit.
If you have a Free membership and want to add more media, you can learn more about upgrading to a Premium membership here.
What is Your Media?
Your Media is the central location where all of your photos, videos, and audio clips are stored. You can access it by clicking on Your Media in the main navigation bar. In the Your Media folder, you can upload, edit, hide, and manage all your media files.
How Do I Upload Media to My Media Bank?
To add new files to your account, follow these steps:
Click Your Media in the main navigation bar.
Select the appropriate tab for the media type: Photos, Videos, or Audio.
Click the Upload button (e.g., "Upload Photos").
Drag and drop your file into the upload window or click Browse to select a file from your device.
Accepted file types include:
Photos: .jpg, .jpe, .jpeg, .png, .gif
Videos: .mov, .mkv, .mp4
Audio: .aiff, .m4a, .mp3, .ogg, .wav
Once uploaded, you can rename your video or audio files by clicking on "Rename" under the file's title. Please note that you cannot rename a file after it has been sent.
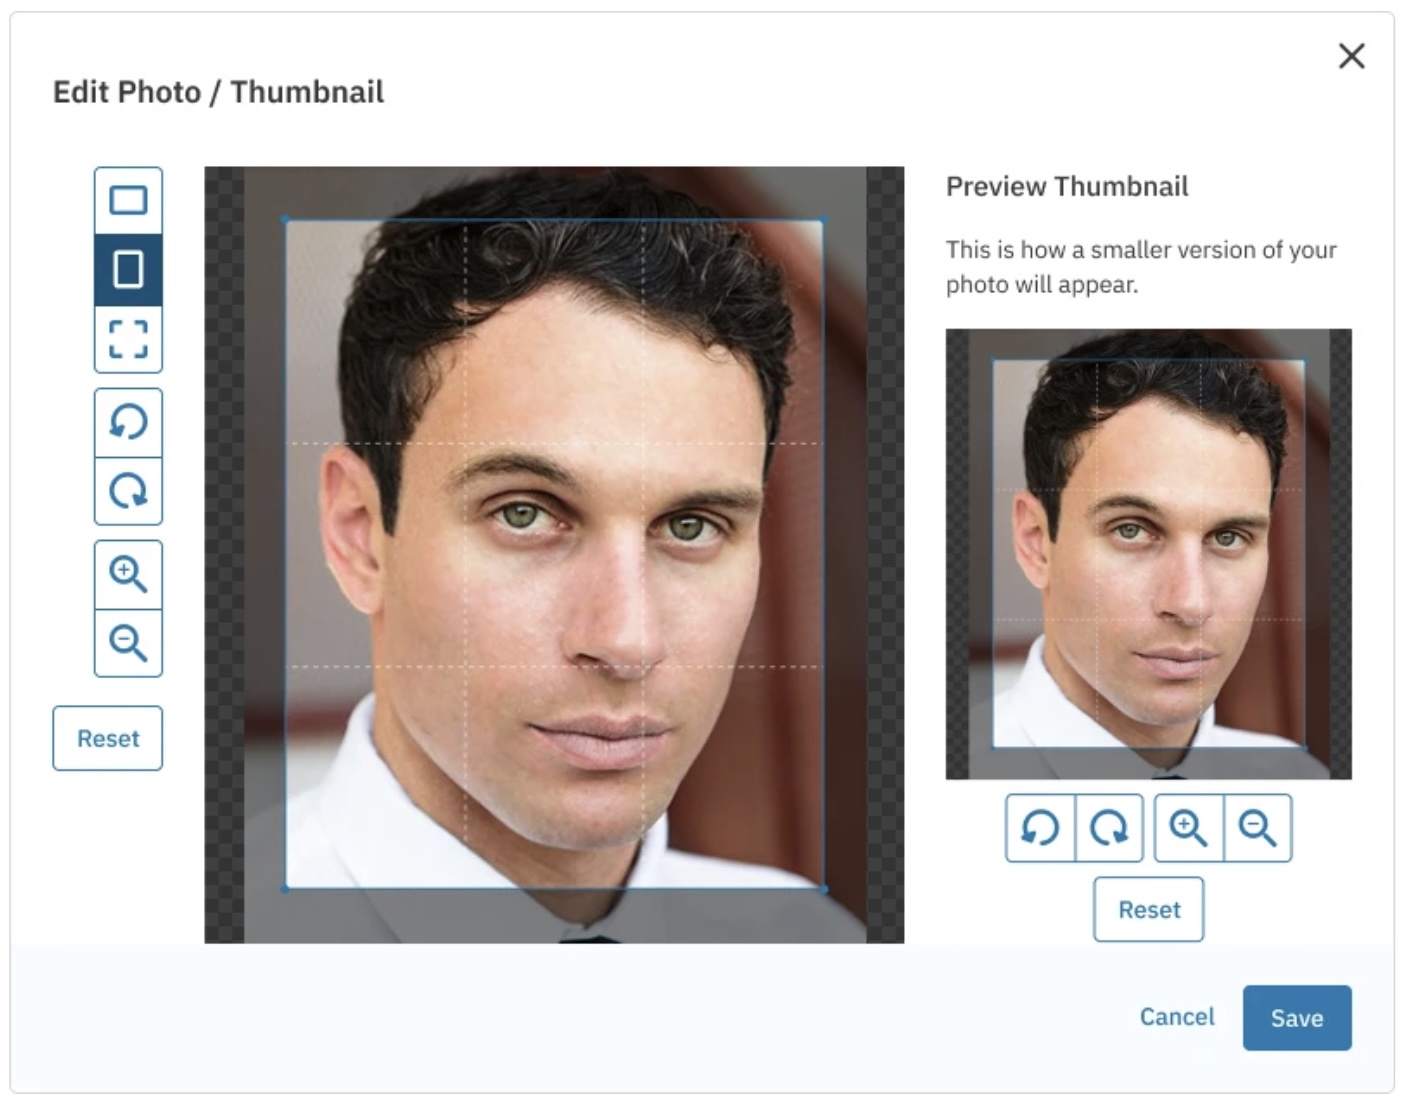
How Do I Edit My Photos and Thumbnails?
You can rotate your photos or adjust their thumbnails directly on the platform. Any edits made will be reflected on every profile where the photo appears.
Click Media Bank in the top navigation bar and select Photos.
Click the three dots (⋮) to the right of the photo you want to edit.
Select Edit Photo/Thumbnail.
Use the provided buttons to rotate, crop, or zoom in and out of your photo and its thumbnail.
When you are finished with your adjustments, click Save.
How Do I Rearrange the Order of My Media?
You can change the order of your media for each of your profiles. The changes you make will only apply to the profile you are currently viewing.
Rearranging Photos
Click Your Profile from the top navigation bar.
Scroll to the Photos section and click Rearrange Photos.
Use the arrows to move your photos into the desired order. The photo in the first position will automatically become your Primary Photo for that profile.
Click Save Order.
Rearranging Videos and Audio
Navigate to Your Profile and scroll to the Videos or Audio section.
Click Rearrange Videos or Rearrange Audio.
Use the arrows to change the order of your clips.
Click Save Order.
To set a primary reel, click the three dots (⋮) next to any clip and select Set as Video Reel or Set as Audio Reel.
How Do I Make Media Visible on My Profile?
When you upload new media, it is added to your Media Bank but will not appear on your profiles until you assign it. To choose which profile(s) your media will appear on:
Go to your Media Bank and select the Photos, Videos, or Audio tab.
Find the item you want to display and click the three dots (⋮) to its right.
Select Hide/Show on Profile.
Check the box next to the specific profile(s) where you want the media to be visible.
Click Save.
Locked Media and Premium Memberships
If you are on a Free Basic Membership, you will have access to two free photo uploads, one free video upload, and one free audio upload. Once you have used these free credits, any additional media you upload will be locked and not visible on your profile.
To unlock and add more media, you will need to upgrade to a Premium Membership, which offers unlimited media uploads and other exclusive features. To unlock a specific media file:
Log in to your account and go to Your Media.
Select the type of media you want to unlock.
Find the locked media item.
Click the three dots next to it and select "Unlock."
FAQ’s
Why are my photos locked?
Photos may be locked if you are on a Free Basic Membership and have already used your free media credits. To unlock them, you will need to upgrade to a Premium Membership.
How do I hide photos on my profile without deleting them?
To hide a photo, go to Your Media, click the three dots next to the photo, select Hide/Show on Profile, and uncheck the profiles where you want it hidden.
Why is my profile missing photos or other information?
Information such as media and skills is stored on a per-profile basis. If you see missing information, ensure you have claimed and logged into the account that contains your most recent profile data.
How can I rotate a photo that appears sideways?
In your Media Bank, find the photo, click the three dots, select Edit Photo/Thumbnail, and use the arrow buttons to rotate it to the correct orientation.
Can I rename my media files?
Yes, you can rename video or audio files by clicking "Rename" under the file's title in Your Media. Please note that you cannot rename a file after it has been sent in a submission.